ClickMaster2000: Click things, get counts!
A tally counter for images
ClickMaster2000 is a simple tally counter for images: a program to count
objects inside an image. You can load images containing objects that need to be
counted, click on each one of them, and then read the total without having to
keep mental record.
ClickMaster2000 is geared for batch, precise counting on dense images where
automated recognition is not easily possible. ClickMaster2000 was originally
designed for microbiology imagery.
Windows: simply copy the executable into a suitable location and run.
Source/Linux: first install the required dependencies (Python3, PyQt5
and setuptools). On a Debian/Ubuntu system run:
sudo apt-get install python3-pyqt5 python3-setuptools
Then proceed with regular installation:
tar xzf clickmaster2000-X.Y.tar.gz
cd clickmaster2000-X.Y
sudo ./setup.py install
Click “Open” or press Ctrl+O to open a new image.
Click anywhere to add a new colored point. The current count is updated
immediately. You cannot add a point over an existing one. Right-click on a
point to delete it.
Drag with the right mouse button to pan the view. Use the mouse wheel to zoom
the view. The image zooms on the current mouse position.
Use the point slider to change all point sizes. Use the mouse wheel with Ctrl
held to do the same.
Use the “Grid” button, press Ctrl+G or ‘g’ on the keyboard to toggle the grid.
Use the grid slider to change the grid size. Use the mouse wheel with Shift
held to do the same. Empty cells are highlighted for convenience.
Select the current color by using the dot next to the color. Change the current
color by pressing ‘1’, ‘2’ or ‘3’ on the keyboard more conveniently. ‘x’ cycles
between the last two selected colors.
Click on the count to change the color. Existing points are recolored.
The “Clear” button clears all the points. The reset button next to the colors
only clears that color.
Press Ctrl+C or ‘c’ on the keyboard to copy the current color count to the clipboard.
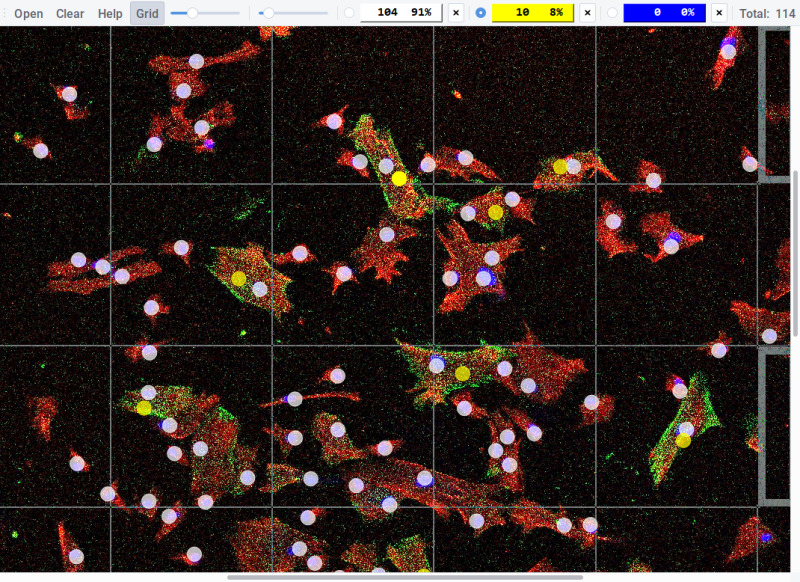
- Grid size slider (Shift+mouse wheel)
- Point size slider (Ctrl+mouse wheel)
- Current color (cycle with ‘x’, select with ‘1’, ‘2’ or ‘3’ on the keyboard)
- Counter, percentage and (by clicking) color selector
- Single counter reset
- Total (counter 1+2+3)
- Suggested grid size
- Square with points (regular borders)
- Empty square/s (thick borders)
Pre-sort your images so that each folder contains a related set of images (same
subject or same experiment). Process each folder in turn, starting from the
first image in each and progressing alphabetically.
Start ClickMaster2000 and maximize the window.
When opening the first image an initial grid size is chosen automatically.
Tweak the grid size so that each square contains a reasonable amount of objects
to count. Do not exceed 10 objects per square. An ideal count is around 5. For
images that contain clustered objects, choose a size that contains no more than
a single cluster in each square.
Zoom on the top-left corner and adjust the view so that the entire square fills
3/4 of the screen, with neighboring squares still being partially visible.
Click on all the objects in the current square only.
Ensure that the point colors have strong contrast in respect to the image.
Click on the toolbar counter (the colored label) to change the color at any
time. Good contrast ensures objects are not easily missed. Adjust the point
size using Ctrl+wheel so that each point covers 3/4 of the object, with some
borders still being visible.
For objects that overlap the border, click only on those whose “ideal center”
is within the current square. The nucleus of a cell would be an ideal point to
consider, even if large parts of a cell are within a different square. This
ensures no object is easily counted twice.
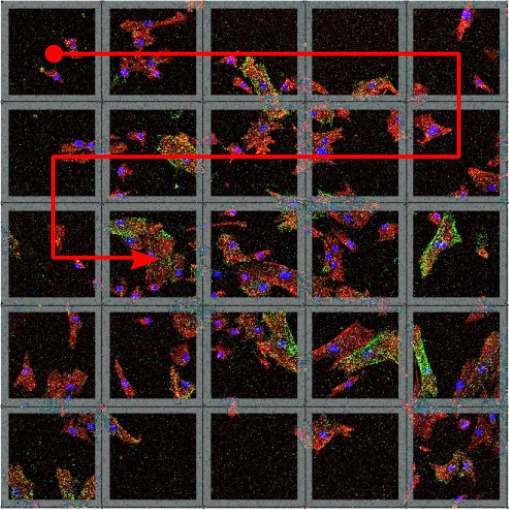
When complete, proceed to the next square on the right, until the row is
complete. Switch then to the right-most square in the next row, proceeding
left, in a zig-zag pattern until each square in the image has been inspected thoroughly.
Adjust the zoom so that the entire image is now visible. Inspect squares with
thick borders (indicating that they’re empty). Enlarge and reduce the grid size
up to 10% rapidly using Shift+wheel in order to move the boundaries. While
doing so, look for squares that cycle between thick/thin borders, suggesting a
missed object in the vicinity.
When satisfied, press Ctrl+c to copy the current object count to the clipboard.
When counting multiple classes of objects in a single image (such as two kinds
of stained cells), less errors are generally produced by counting one class
at a time and restarting from a clean image by pressing “Clear”. If this is too
time consuming, counting one class at a time in each square is the next best
approach: while counting objects in a single square, only switch colors after
the first class has been completely counted. Press ‘x’ to switch between two
colors and avoid distracting movements to the toolbar.
When multiple colors are used in a single image, percentages are also shown in
the toolbar. Once all objects are counted, proceed with the next image. The
grid size, point size and colors are preserved so that counting on similar
images in succession doesn’t require many adjustments.