RescueOMR tutorial
The following is a practical tutorial for RescueOMR. You’ll learn how to detect checkbox questionnaire values starting from scratch, using a set of scanned documents including multiple questionnaires.
Requirements
The tutorial requires about 30-45 minutes and assumes a decent understanding of Unix as well as shell scripting experience.
To follow this tutorial the following is required:
- Sample data files (CC-BY-SA 4.0)
- Gimp and Inkscape
- Miller for data aggregation
Tutorial Setup
Assuming a Debian/Ubuntu distribution, install all required dependencies using apt-get:
sudo apt-get install python3-pil python3-lxml python3-numpy
sudo apt-get install python3-scipy python3-skimage
sudo apt-get install gimp inkscape miller
Get RescueOMR:
$ wget https://github.com/EuracBiomedicalResearch/RescueOMR/archive/master.zip
$ unzip master.zip
$ cd RescueOMR-master
Verify that all dependencies are correctly installed:
$ ./bin/extractmpl
usage: extractmpl [-h] [-v] [-r REGION] [-s SCALE] template image output
extractmpl: error: the following arguments are required: template, image, output
$ ./bin/simpleomr
usage: simpleomr [-h] [-d DEBUG] [-v] template image
simpleomr: error: the following arguments are required: template, image
Get and extract the sample data files into data/:
$ wget https://www.thregr.org/wavexx/software/RescueOMR/files/sample-data.zip
$ mkdir data
$ cd data
$ unzip ../sample-data.zip
$ ls
000428.jpg  005778.jpg  015052.jpg  023034.jpg  029404.jpg
002918.jpg  007015.jpg  016828.jpg  023432.jpg  030030.jpg
003346.jpg  008087.jpg  018417.jpg  026228.jpg  COPYING.txt
003542.jpg  009916.jpg  021387.jpg  026494.jpg  README.txt
003720.jpg  011264.jpg  021483.jpg  027108.jpg
005212.jpg  013257.jpg  021931.jpg  027402.jpg
005771.jpg  014341.jpg  022324.jpg  028526.jpg
You should now have the following directory tree:
RescueOMR-master
RescueOMR-master/bin
RescueOMR-master/data
Examining the data files
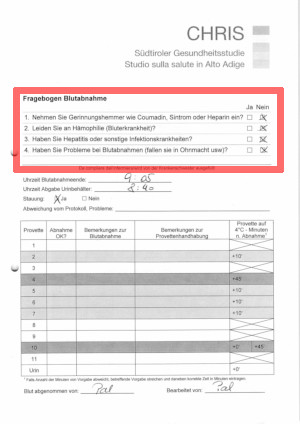
The sample pages come from an internal questionnaire filled by nurses during blood drawing, and were initially meant for internal bookkeeping purposes only. As such, the questionnaire was never designed for digitization: the page layout was modified by staff members several times over the course of regular operations and comes in two language variants. No special instructions were given about filling the checkmarks.
We’re nonetheless interested in generating summary statistics about blood drawing issues, notably using the checkbox questionnaire as marked in the page on the right.
There are four questions, with a yes/no checkbox for each.
Give a cursory look at the sample data using an image viewer and answer the following questions:
- How many questionnaire variations can you spot?
- How many questionnaire templates are visually identical?
Examination summary
Having a good idea about the questionnaire to be digitized should always be the first step.
The sample data contains the following:
- Three variants for the German questionnaire (A, B, C)
- A single variant in Italian (D)
- A single variant of an uninteresting page (E)
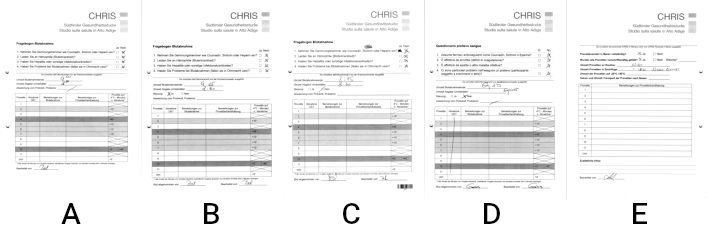
Compare the differences of the three German questionnaires. The page layout was lengthened in variant B, shifted down and a few unrelated features were added at the bottom. In variant C a barcode was added, while the content was shifted upwards to make space for it.
In all three variants though, the checkbox layout and spacing remained virtually identical. For confirmation, try for yourself to overlay the pages and verify that the spacing and relative positioning is identical. Since RescueOMR is based on visual identification, this means that a single image template (if cut small enough) can be used to locate the checkboxes on all three variants.
The Italian checkboxes have unfortunately different spacing, and thus require a dedicated template.
There are no interesting features in page E, as well as no visually similar checkboxes that could influence our image matching. We can safely ignore them.
In a normal scenario, you would quickly flip through the available pages, looking for major differences and building a small sampler of pages to be matched. You’ll be using the subset to generate the required templates and do a small test run. By identifying the required templates in advance, there will be less work in analyzing the match failures later on.
Generating the first template
extractmpl looks for an image to extract inside an existing page. The visual search is done using a cleaned sample from the page itself, called the “template”.
After having identified the possible page variations, it’s time to create the first image template to be used with extractmpl.
The image template is used both to locate the checkboxes and also to assign identifiers in a second step.
Start by opening a scanned page in either German or Italian. Since we determined in advance that the three German templates have the same visual area around the checkboxes, it doesn’t matter which variation you’re going to open. We start with the Italian version first for simplicity.
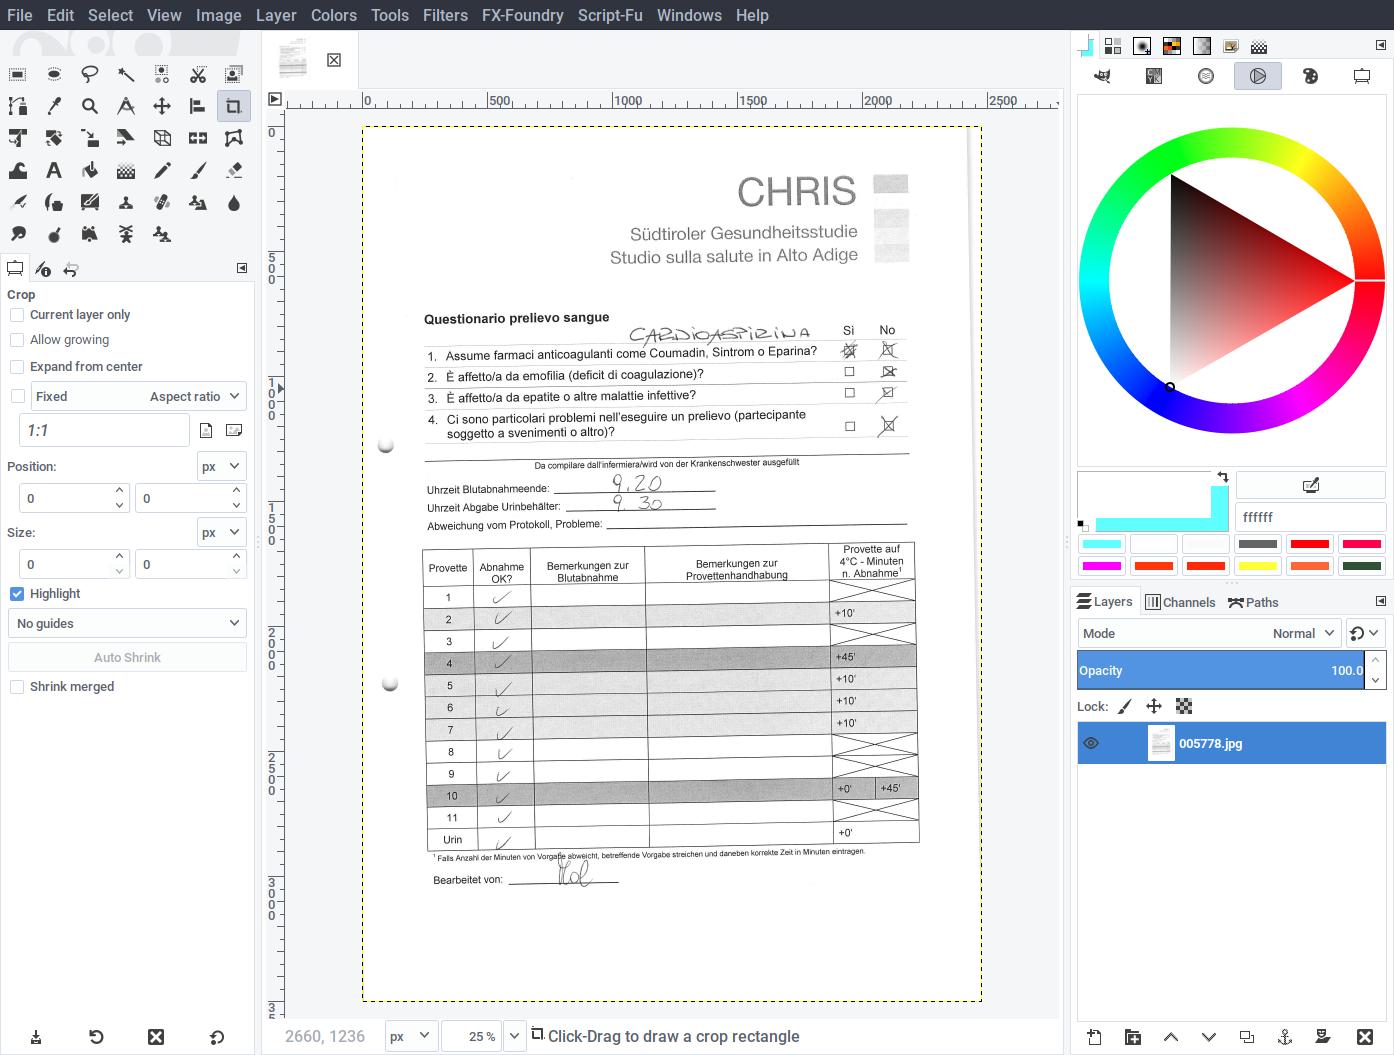
After opening the template you should rotate the page so that the checkboxes become square and straight. To aid in rotation, you can drag a guide from the vertical and horizontal ruler and position it next to the checkboxes. Then use the rotate tool and align all the vertical edges to it.

Use the crop tool to highlight and cut an area around the checkboxes, leaving a good margin around the checkboxes. We included the Yes/No labels, which is not strictly necessary, but they provide some feedback for the user as well as extra detail required to be found in the page. As the labels do not change between the German variations of the questionnaire, there is no harm in doing so. We could also include the entire text of each question on the left (similarly, it’s identical in all variations), but doing so would slow-down the matching for no real gain.

Zoom on each checkbox and, using the eraser tool, clear any pen mark, smudge or speckle until the checkboxes are as similar as possible as an unused copy of the questionnaire. Be as precise as possible: do not remove the underlying geometry of the checkbox.

The resulting template should then be similar to what’s shown on the left. Export the image to RescueOMR-master/template-it.png, to indicate that this is the template for the Italian questionnaire.
Testing the template
Once the template is ready, the first step is to ensure it matches the same page where it was extracted from.
$ ./bin/extractmpl -v template-it.png data/005778.jpg test.png
INFO:root:found 49 features in template
INFO:root:found 2600 features in image
Examine the output file test.png generated by extractmpl:
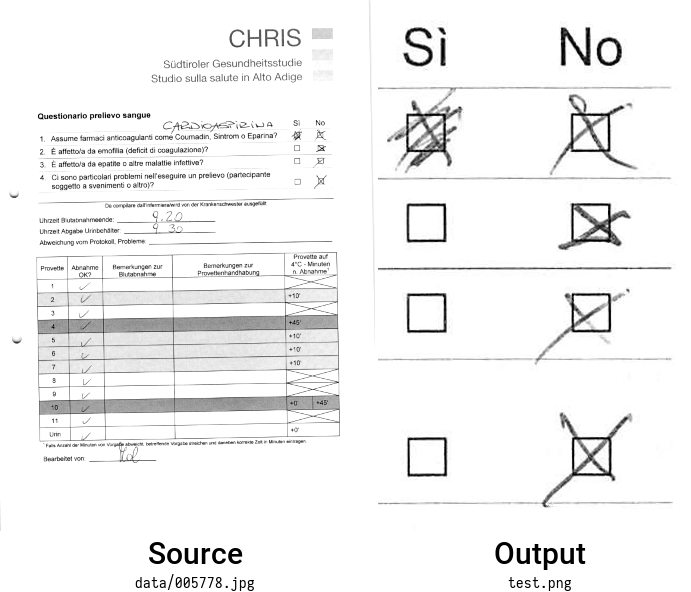
Notice how extractmpl extracted the same visual area of the template, but directly from the page. The same size and orientation as our template was kept.
Repeat the test using at least two more pages, ensuring you get an output file for each.
A matching failure would result in a non-zero exit status of extractmpl. If that was the case in one of your tests, make sure the template was correctly cleaned and repeat the test until it succeeds.
You might have noticed that the matching process is quite slow. Before writing a batch script, we should take advantage of the fact that the area that we’re interested in is always located in the upper-right region of the page. The precise location changes from page-to-page, but we can narrow down the region a lot by simply providing a boundary location with the “-r” flag.
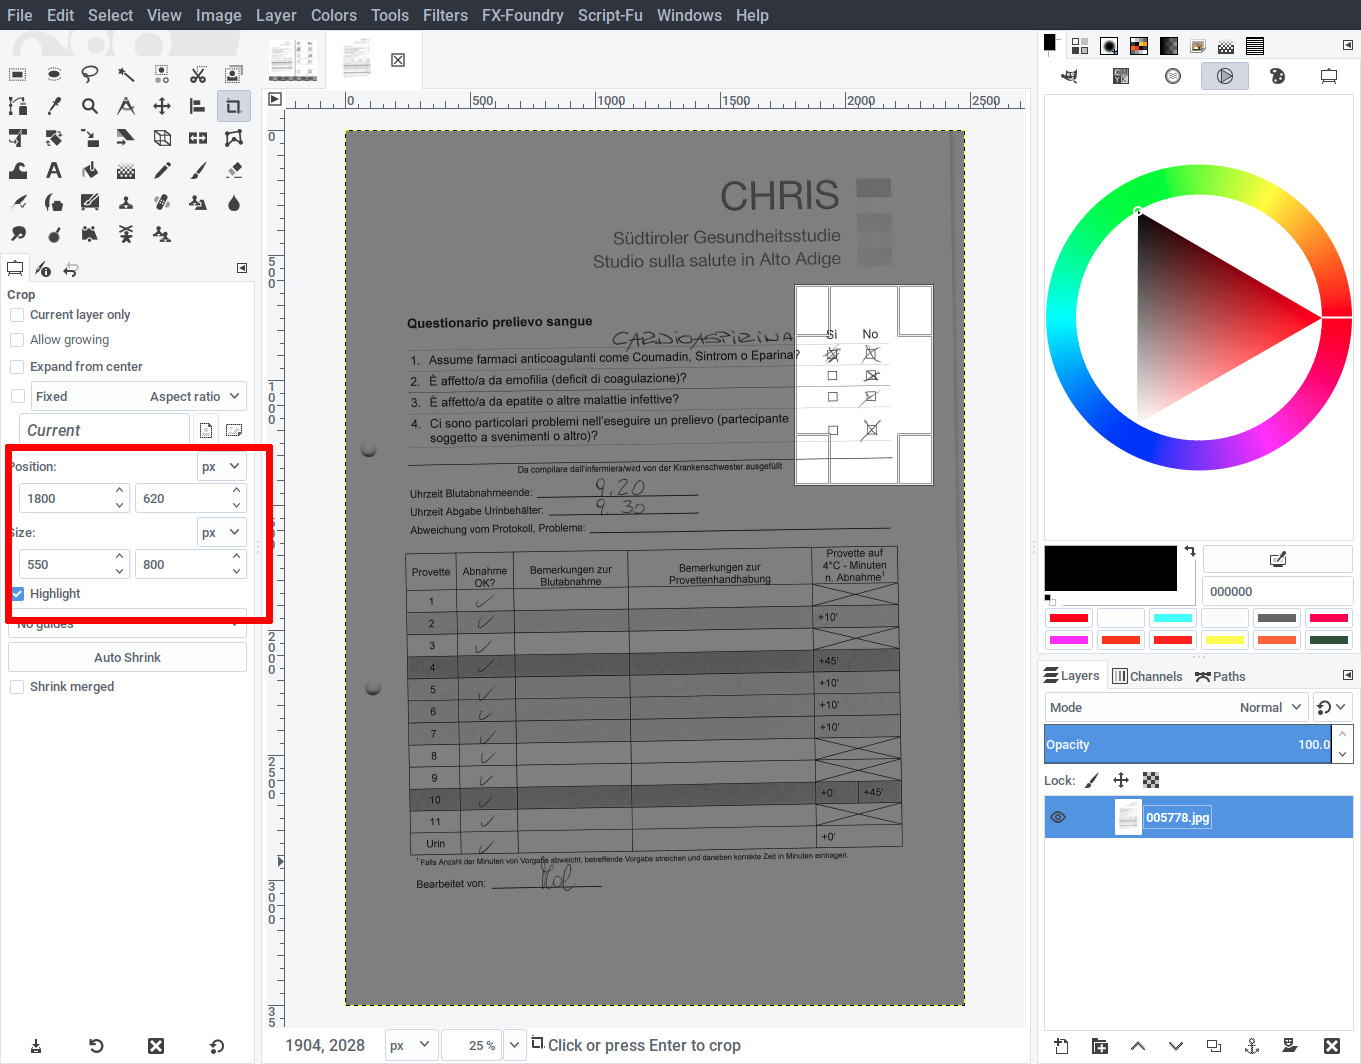
Again, use Gimp and open the same page as before. Use the crop tool to highlight the region around the location of the template (being quite generous this time), and write down the position as written in the tool’s parameters shown on the left. Do not copy the same exact values: derive your own.
Use the extracted position and size while invoking extractmpl using a standard geometry specification: WIDTHxHEIGHT+TOP+LEFT:
$ ./bin/extractmpl -v -r 550x800+1800+620 template-it.png data/005778.jpg test.png
INFO:root:found 49 features in template
INFO:root:found 64 features in image
Notice how the processing time has reduced considerably. Repeat the same test using three more pages, to ensure the region specified is not too small: we need to account for all possible page shifts and distortions.
Extracting checkbox values
Once we are able to extract the checkboxes out of each questionnaire page, simpleomr allows to extract the value of each in a text file.
simpleomr needs to know the location of each checkbox, as well as an identifying name for each. We can use Inkscape to do both easily.
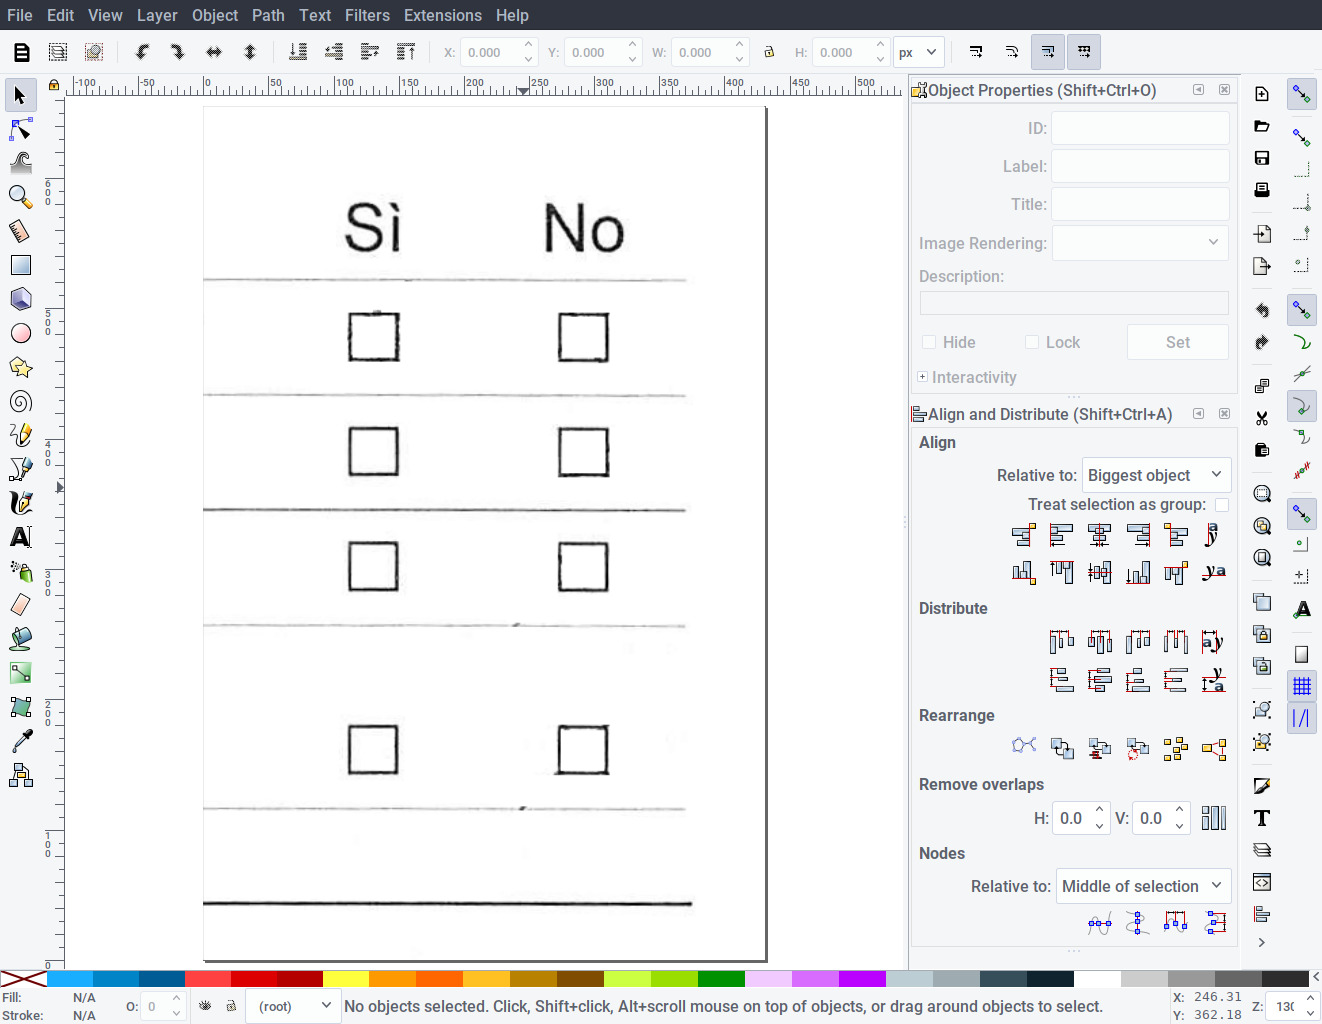
Start Inkscape with an empty document. Open the template you generated earlier: RescueOMR-master/template-it.png. Inkscape will automatically set the page size to the same size as the template.
Select the Rectangle tool and draw a square around the first checkbox. Enclose the checkbox completely, leaving a good padding (30-50% of the checkbox itself) inside. Fill the checkbox and set the transparency to 70%, in order to see underneath the position of the underlying checkbox.
Do not rotate, group, or use any other tool while drawing the checkboxes. Use the rectangle tool exclusively. You can duplicate or copy/paste the rectangles to speed-up the process. Repeat the above until all checkboxes have been drawn.
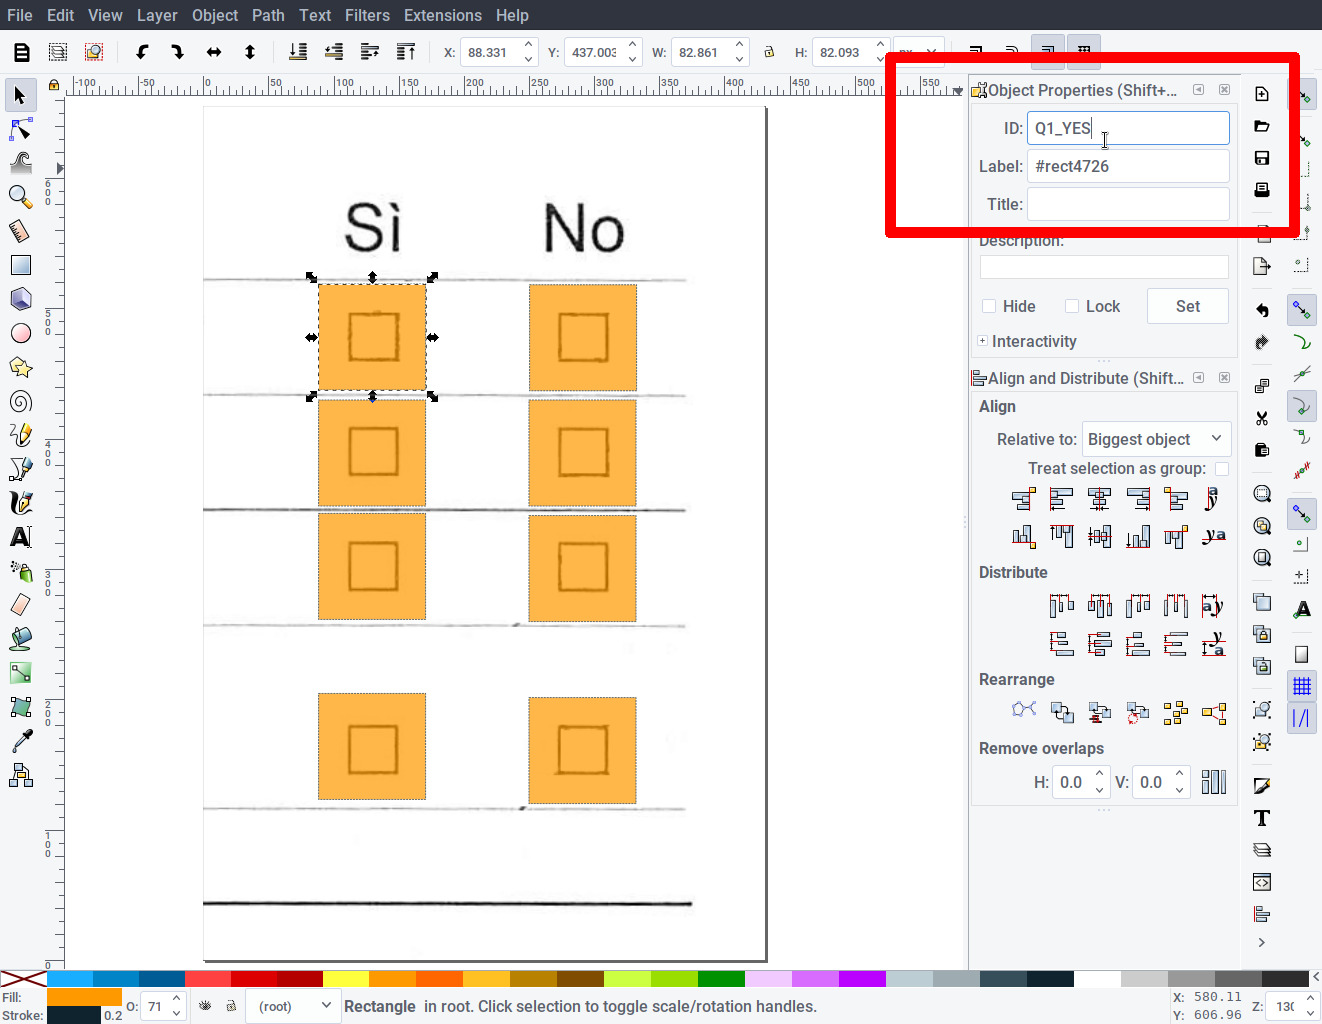
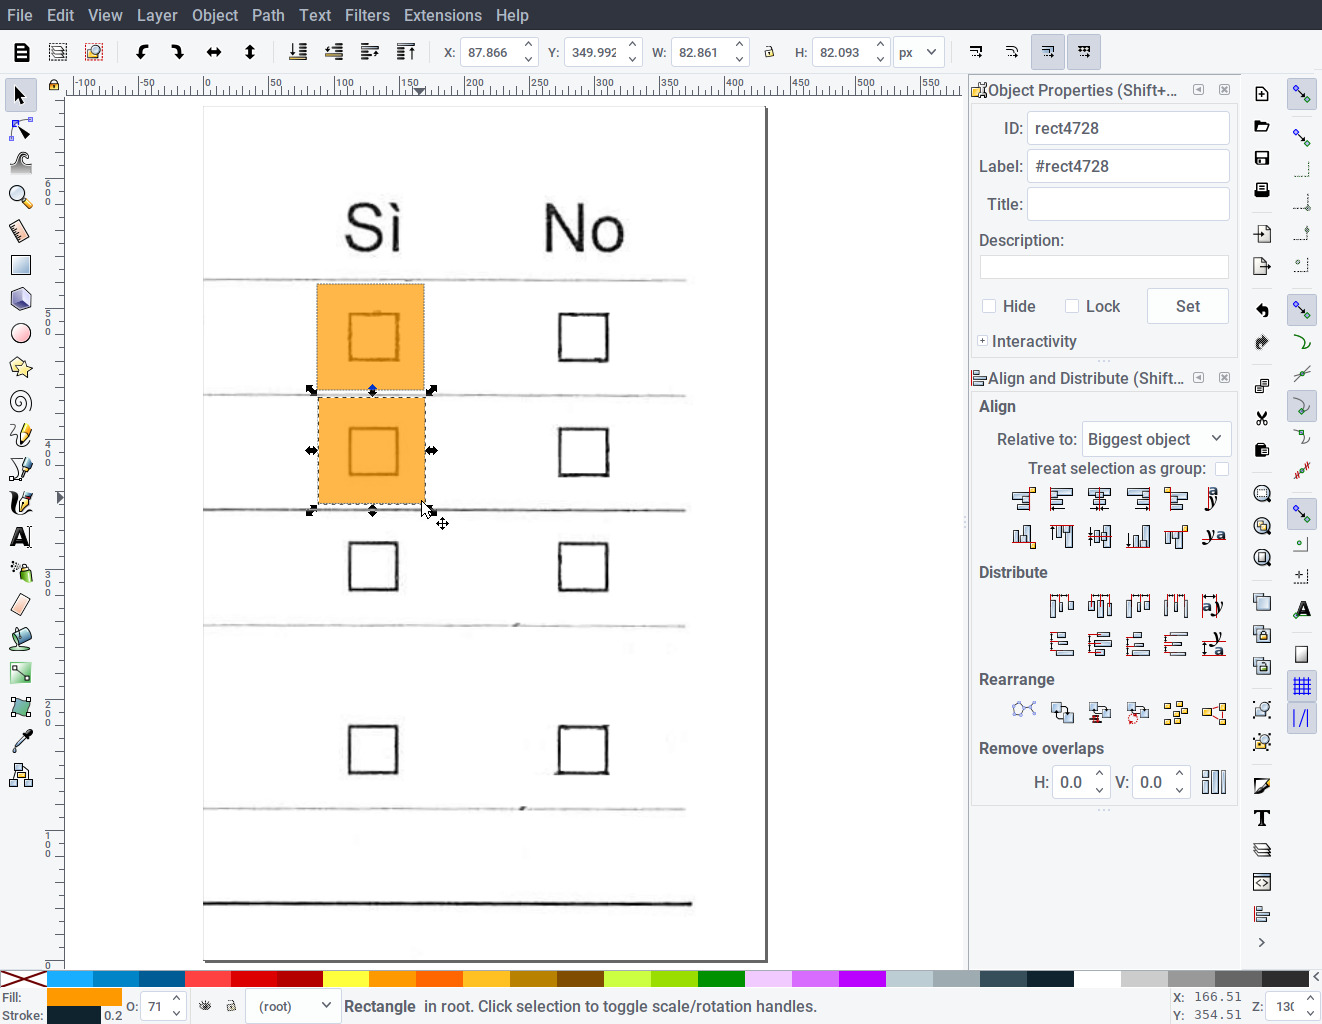
To assign an identifier to each box, right click on a rectangle and select “Object properties”. In the Object properties panel, change the “ID” field to an unique identifier. This identifier will become the key in the output table. It should be short and self-explanatory.
We used “q1_yes” / “q1_no” / “q2_yes” … in order to identify both the question number (1/2/3/4) and each yes/no value independently. Save the file as RescueOMR-master/marks-it.svg.
We are now ready to extract the values.
simpleomr requires the output images generated by extractmpl (that we wrote down previously as test.png) and the checkbox locations (marks-it.svg). Run simpleomr as follows:
$ ./bin/simpleomr -d debug.png marks-it.svg test.png
q1_yes   2   0.3721153846153846
q1_no    1   0.13197115384615385
q2_yes   0   0.0
q2_no    1   0.1860576923076923
q3_yes   0   0.0
q3_no    1   0.06899038461538462
q4_yes   0   0.0
q4_no    1   0.13846153846153847
simpleomr will output a table containing the checkbox ID, the checkbox value and the raw fill value (the last column being present only when -d is used).
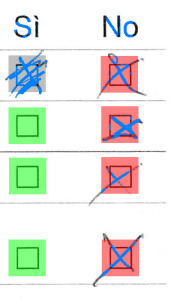
For this test, we also requested to write a debug image into debug.png that we can use to inspect the results visually.
The checkbox values/colors are encoded as follows:
code color description -1 yellow unknown 0 green empty 1 red checked 2 gray filled
Only a quick inspection is required to ensure that each checkbox has been correctly located and that the values match our expectations. A more in-depth validation will be done after batch processing all pages and aggregating results.
Batch processing
With the image template (template-it.png) and checkbox locations (marks-it.svg) being ready and tested, we can now process all pages at once. A simple trivial script is needed:
#!/bin/sh
mkdir -p results
for file in data/*.jpg
do
 page="$(basename "$file" .jpg)"
 echo "processing $file ..."
 ./bin/extractmpl -r 550x800+1800+620 template-it.png "$file" test.png
 if [ $? = 0 ]
 then
   ./bin/simpleomr marks-it.svg test.png > "results/$page.txt"
 else
   echo "  $file: template not found"
 fi
done
Copy the above into process.sh, make it executable, then run it:
$ chmod +x ./process.sh
$ ./process.sh
processing data/000428.jpg ...
  data/000428.jpg: template not found
processing data/002918.jpg ...
  data/002918.jpg: template not found
processing data/003346.jpg ...
  data/003346.jpg: template not found
...
The script tries to match the template against each page in the data/ directory. When a match is found, the output is fed immediately to simpleomr whose output is then redirected into a file with the same name in results/.
There are only two questionnaires in Italian, so you should end up with exactly two files in the results/ directory:
$ ls results
005778.txt  021931.txt
$ cat results/005778.txt
q1_yes   2
q1_no    1
q2_yes   0
q2_no    1
q3_yes   0
q3_no    1
q4_yes   0
q4_no    1
Handling variations
Handling multiple questionnaire variations follows exactly the same procedure as above, but requires an image template and checkbox locations for each variation.
Repeat the same steps starting with a German questionnaire and produce a cleaned image template, saving it as template-de.png. From the template, save the checkbox locations as marks-de.svg. Test both in isolation before trying to automate the procedure.
With both templates ready, a simple approach would consist in running the previous script twice, with a different template for each run. Doing so would process all pages twice though, incurring in significant overhead.
We can modify the script instead, in order to check for the most likely template first (in our case that is the German version), then try with Italian, and then also save any skipped page:
#!/bin/sh
mkdir -p results skipped
for file in data/*.jpg
do
  page="$(basename "$file" .jpg)"
  echo "processing $file ..."
  ./bin/extractmpl -r 550x800+1800+620 template-de.png "$file" test.png
  if [ $? = 0 ]
  then
    ./bin/simpleomr marks-de.svg test.png > "results/$page.txt"
    continue
  fi

  ./bin/extractmpl -r 550x800+1800+620 template-it.png "$file" test.png
  if [ $? = 0 ]
  then
    ./bin/simpleomr marks-it.svg test.png > "results/$page.txt"
    continue
  fi

  ln "$file" "skipped/$page.jpg"
  echo "  $file: template not found"
done
Run the script:
$ ./process.sh
processing data/000428.jpg ...
processing data/002918.jpg ...
processing data/003346.jpg ...
processing data/003542.jpg ...
  data/003542.jpg: template not found
processing data/003720.jpg ...
processing data/005212.jpg ...
...
The results/ directory now contains all the required data files, with the same name as the source image. There should be 5 images which were skipped because they do not contain a matching template: they are linked in the skipped/ directory for final inspection. Verify those images to ensure they do not contain any missed checkboxes.
Aggregating data
To make results easier to query, it’s often convenient to have all files consolidated into a single table.
Since the output files are simple tab-separated text, there are a multitude of Unix tools that we can use. In this tutorial, we take advantage of Miller, a general text/tabular toolkit, to quickly output a table in a single shot:
$ mlr --tsv --inidx \
  label q,a then \
  nest --explode --values --across-fields -f q --nested-fs _ then \
  put '$file = FILENAME' \
  results/*.txt > aggregated.txt
The command does the following in sequence:
- Reads each input file as tab-separated, with no labels
- Assigns column labels to existing columns (“q/a” for Question and Answer respectively)
- Splits the question ID out of the “yes/no” field so that we can select both independently as “q_1” and “q_2”
- Adds a new column “file” in order to retain the page source
- Save the results to aggregated.txt
This produces the following table:
$ head aggregated.txt
q_1   q_2   a   file
q4    yes   0   results/000428.txt
q4    no    1   results/000428.txt
q3    yes   0   results/000428.txt
q3    no    1   results/000428.txt
q2    yes   0   results/000428.txt
q2    no    1   results/000428.txt
q1    yes   0   results/000428.txt
Validating answers
Although the data seems ready to used, it’s important to note that some results can include unknown values (checkboxes which are borderline between empty and filled) as well as incoherent answers.
Checking for unknown values is now easy, and again we can make use of Miller to search for all checkboxes that contain such values:
$ mlr --tsv filter '$a == -1' aggregated.txt
q_1   q_2   a   file
q4    no    -1  results/015052.txt
q4    yes   -1  results/023034.txt
015052
023034
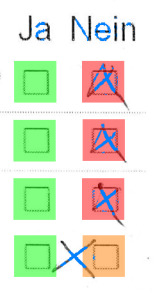
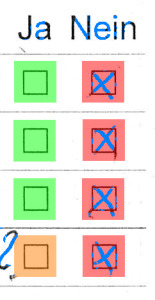
We seem to be lucky: we only find two such results. The images however highlight an issue: what’s the real result of the question?
To furthermore check for consistency, we cannot look at each checkbox in isolation: we need to validate both at the same time.
Since RescueOMR has no notion of the question layout, it doesn’t know whether a question is comprised of a single checkbox, if comes in yes/no pairs, if it’s a “select multiple” question, or a rating scale with multiple checkboxes. Consitency checks will always depend on the questionnaire layout at hand.
To be able to use both values (yes/no) at the same time in a filter expression we need to change the format of the data so that both are available in the same row. This can be done using the reshape command of Miller:
$ mlr --tsv reshape -s q_2,a -o a aggregated.txt > reshaped.txt
$ head -5 reshaped.txt
q_1  file                yes  no
q4   results/000428.txt  0    1
q3   results/000428.txt  0    1
q2   results/000428.txt  0    1
q1   results/000428.txt  0    1
We now have to stipulate how both checkbox states influence the answer, based on how the questionnaire was answered. For a yes/no answer, the following rules seem to capture the desired outcome:
- An unknown value in either checkbox results in an unknown answer (we want to exclude mistakes).
- If both checkboxes are the same, the answer is also unknown (obviously undecidable).
- If a checkbox is filled (code 2) it should be ignored (it’s an intentional correction) …
- Unless it’s the only checked box, in which case it counts as a regular answer.
The rules reduce to the following expression:
$ mlr --tsv put '$res = ($yes == $no || $yes == -1 || $no == -1? -1: \
                 $yes == 1 || $no == 2? 1: 0)' reshaped.txt > final.txt
$ head final.txt
q_1  file                yes  no  res
q1   results/021931.txt  0    1   0
q4   results/022324.txt  1    2   1
q3   results/022324.txt  0    1   0
q2   results/022324.txt  0    1   0
q1   results/022324.txt  0    1   0
q4   results/023034.txt  -1   1   -1
026494
We repeat the same validation process, this time using the “res” column in final.txt. There is one more answer which escaped our previous check on page 026494:
$ mlr --tsv filter '$res == -1' final.txt
q_1  file                yes  no  res
q4   results/015052.txt  0    -1  -1
q4   results/023034.txt  -1   1   -1
q2   results/026494.txt  2    2   -1
As before, we cannot trivially decide without doubt what the true answer would be.
Summary Results
The breakdown summary on each question can be calculated using the “res” column in final.txt:
| q_1 | res | % |
|---|---|---|
| q1 | no | 88% |
| yes | 12% | |
| q2 | unknown | 4% |
| no | 96% | |
| q3 | no | 100% |
| q4 | unknown | 8% |
| no | 80% | |
| yes | 12% |
Manual review of uncertain answers would be a further refinement of the digitization process. It is recommended that on a a questionnaire without explicit instructions, any dubious result should always be either discarded or trigger a manual review process.
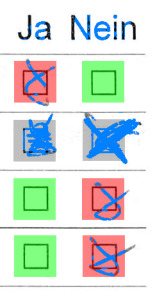
Dubious results often include any answer with corrections. This can be shown by checking all results with at least one filled checkbox:

Although most results are correct, page 003720 (first on the top/left) shows another undecidable example that cannot be easily detected without context.